原型模式(Prototype)
原型模式Prototype,用原型实例指定创建对象的种类,并且通过拷贝这些原型创建新的对象。
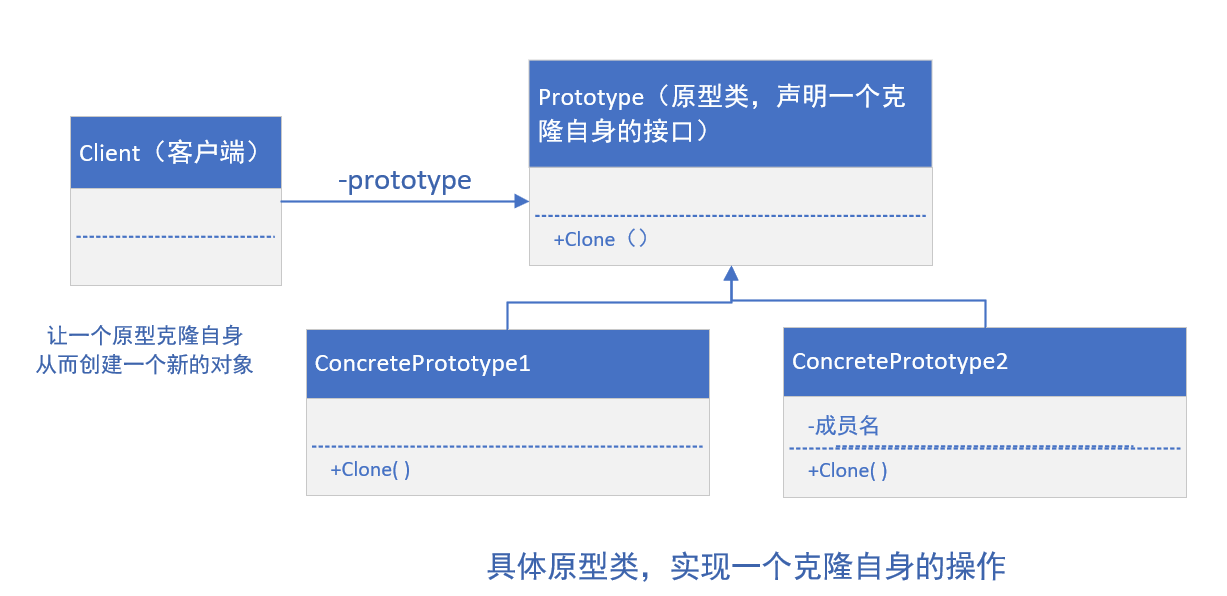
原型模式结构图
原型模式代码结构
1
2
3
4
5
6
7
8
9
10
11
12
13
14
15
16
17
18
19
20
21
22
23
24
25
26
27
28
29
30
31
32
33
34
| 原型类
abstract class Prototype
{
private string id;
public Prototype(string id)
{
this.id = id;
}
public string id
{
get{return id;}
}
public abstract Prototype Clone();
}
具体原型类
class ConcretePrototype1 : Prototype
{
public ConcretePrototype1(string id) : base(id) { }
public override Prototype Clone()
{
return (Prototype) this.MemberwiseClone( );
}
}
客户端代码
ConcretePrototype1 p1 = new ConcretePrototype1("1");
ConcretePrototype1 c1 = (ConcretePrototype1) p1.Clone( );
Console.WriteLine("Cloned:{0}",c1.id);
|
什么时候使用原型模式呢?
可以想到,每次new一次,都需要执行一次构造函数,如果构造执行花费的时间长,那么多次执行这个初始化操作实际上是非常低效的。
一般在初始化的信息不发生变化的情况下,克隆是最好的办法,这样既隐藏了对象创建的细节,又对性能是大大的提升。
不用重新初始化对象,而是动态地获取对象运行时的状态。
拷贝对象,通过传引用,而不是传递值,这样做,相当于b,c处的均指向a处
1
2
3
4
5
| Resume a = new Resume( );
a.setWorkExperience( );
a.xxx = xxx;
Resume b = a;
Resume c = a;
|
通过Clone方法来创建一个副本对象。
例子
简历类的克隆
1
2
3
4
5
6
7
8
9
10
11
12
13
14
15
16
17
18
19
20
21
22
23
24
25
26
27
28
29
30
31
32
33
34
35
36
37
38
39
40
41
42
43
44
45
46
47
| 简历类
class Resume : Icloneable
{
private string name;
private string sex;
private string age;
private string timeArea;
private string company;
public Resume(string name)
{
this.name = name;
}
public void SetPersonalInfo(string sex,string age)
{
this.set = sex;
this.age = age;
}
public SetWorkExperience(string timeArea,string company)
{
this.timeArea = timeArea;
this.company = company;
}
public void Display()
{
}
public Object Clone( )
{
return (Object) this.MemberwiseClone( );
}
}
客户端代码:
Resume a = new Resume("求职者姓名");
a.SetPersonInfo("男","19");
a.SetWorkExperience("xx","xx");
Resume b = (Resume)a.Clone( );
b.SetWorkExperience("xxx",xxx);
a.display( )
b.display( )
|
注意!!!,上述例子只是特例,下面需要分清楚【浅表复制与深层复制】
简历的深复制实现
1
2
3
4
5
6
7
8
9
10
11
12
13
14
15
16
17
18
19
20
21
22
23
24
25
26
27
28
29
30
31
32
33
34
35
36
37
38
39
40
41
42
43
44
45
46
47
48
49
50
51
52
53
54
55
56
57
58
59
60
61
62
63
64
65
66
67
68
69
70
| Icloneable:
简历 : Iconeable
+Clone() :Object
+设置个人信息(sex:string ,age : int)
+设置工作经历(timeArea : string, company :string)
+显示( )
class WorkExperience : Icloneable
{
private string workData;
public string workData
{
get{return workData;}
set{workData = value;}
}
private string Company;
public string Company
{
get{return Company;}
set{Company = value;}
}
public Object Clone()
{
return (Object) this.MemberwiseClone( );
}
}
class Resume : Icloneable
{
private string name;
private string sex;
private string age;
private WorkExperience work;
public Resume(string name)
{
this.name = name;
work = new WorkExperience( );
}
private Resume(WorkExperience work)
{
this.work = (WorkExperience)work.Clone();
}
public void SetPersonalInfo(string sex,string age)
{
this.set = sex;
this.age = age;
}
public void SetWorkExperience(string workData,string company)
{
work.WorkData = workData;
work.Company = company;
}
public void Display( )
{
}
public Object Clone( )
{
Resume obj = new Resume(this.work);
obj.name = this.name;
obj.sex = this.sex;
obj.age = this.age;
return obj;
}
}
|